
Hey all, and welcome to what I hope is the first of many posts for the Grassy Gnoll. I’m Evan, and this month I’ll be running through the process of painting Cybertronic Chasseurs from Warzone Resurrection in a Martian/Frontier colour scheme. For anyone unfamiliar with it, Warzone Resurrection is a miniatures wargame based on the Mutant Chronicles RPG setting.
Some of you may be wondering “Evan, why are you using this colour scheme if your basing theme is Martian landscape?” Well, dear reader, I’m painting it like this because I like schemes with a stark contrast to them. For example the blue-steel of the armour plating and gun casing works well to contrast and tie together both the pallid and sickly looking pale flesh of the Chasseur and the earthy rich red-brown of the Martian hinterlands my various armies will be fighting over (You’ll see a terrain guide for building a similar set up in a future update).
Should I have gone for a red-metal look for my armour? Yeah, probably. But I think this scheme also works well to reflect the cold and calculating approach to warfare that the Cybertronic Megacorporation exemplifies so well.

To sound less wanky. I think it looks dope and fits the faction’s image and theme nicely. As long as your own schemes fit that criteria (looks good, and suits the faction) I say go nuts.
I primarily use the Citadel Colours range of paints and washes and brushes from Games Workshop. If you use other brands it shouldn’t be too hard to figure out and match what colours I’m using, but I’ve included a list of colours used and their equivalents between the ranges at the end.
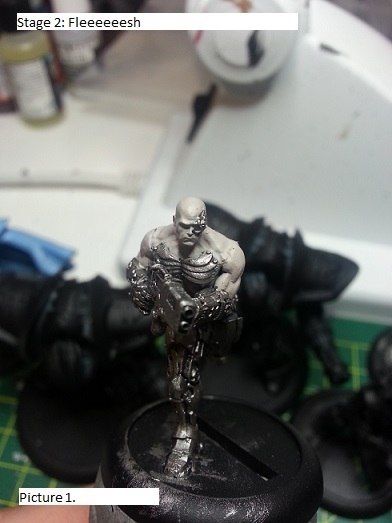
Step 1: Cleaning and assembly.
Start by clipping the Chasseurs off their sprues and giving them a once-over with a soft bristle brush. The brush should be as stiff as a nail brush. Once that’s done, take the time to inspect your models and make sure there are no odd defects or mould lines. Carefully shave away any that you find as long as you can manage to do so without obliterating any important details.
Looking good now? Choice. Let’s get to putting our men together!
First off, take your Chasseur and shave down the connection point on the sole of his boot where you clipped him off the sprue, so that it’s nice and flat. That way you can get a good contact point to glue him to the base. As we are dealing with resin miniatures do remember that you should be using super glue to stick them all together.
As a side note while we’re on the subject of gluing dudes together, I want to briefly touch on a method called pinning. I’ll go into great detail on this in a future article, but for the moment this brief rundown will have to do. Pinning is the practice of taking a component and drilling a hole in the contact point with the purpose of inserting a length of brass rod or steel paper clip, referred to as a “pin” with a matching hole drilled into the opposite contact point where the component would normally be glued to.
You might ask why you would use this method; well for starters the primary use for this technique is to provide a stronger connection than merely glue-to-surface construction. This is more typical to larger scale or multi-component metal miniatures or large scale and high weight resin kits. For something like Warzone minis I’d use this for something like repairing a broken weapon or limb where you can’t trust it to not break again after gluing it back on or if you’re gluing minis to the base but the foot doesn’t have a big enough contact point to support itself with just glue. Or if you’re going for a really bitchin’ pose like you’ll see I’ve done for my upcoming Imperial Stormtrencher conversion guide (also in a future painting and modelling article.)
Now let’s stick the arms on. You can leave them off if you find it easier to paint that way, and I would probably do that if you’re giving your squad a missile launcher, it’s easier to get to everything that way. I personally fully assemble my models before painting because details that would be obscured aren’t going to be seen in the first place.

Cybertronic Chasseurs! The backbone of the fighting forces of Cybertronic.
All finished? Looking something like the stock photo here? Good, let’s go and get these bad boys undercoated. For this guide and scheme I’ll be using a black undercoat, but a white or grey undercoat will work fine too, and the chasseur with the SR400 Blaster, it’s the boxy looking gun with the light bulb underneath it on the far left . I mount my miniatures on a length of wooden stake from the tomato garden with blue-tack under the base, this lets me spray and get into all the spaces on the model and make the most of my can of primer.
Step 2: Base Coating.
Now that your models are assembled and primed, let’s begin with the actual painting. I like to start off with the metallics first when painting my Chasseurs, so from that’s where we’ll begin!
(1) Start with a medium sized drybrush. Scoop a brush full (or two) of Leadbelcher onto your pallet and mix in a drop of water or acrylic medium to get it flowing nicely. Lovely.
(2) Now start brushing away at the leg armour, forearms, chain carbine, chest plates and spinal implants with your drybrush. I like using a brush like this for this stage, because you can cover more area and get into nooks and crannies fairly easily.
(3) You should now have a nice even layer of silver over your armour and guns. If you don’t that’s quite alright, just go ahead and give it another go over once that first layer is dry.


Now let’s start on that flesh.
(1) Begin by taking your standard brush and scooping out a drop or two of Rakarth Flesh onto your pallet, mix in a drop of water or medium as you did with the silver, and then rinse out your brush so you don’t get any paint settling into the ferrule.
(2) Now, being more careful in the application, start painting in the flesh of the chest, upper arms, head and face(depending on which Chasseur you’re working on at the moment), being careful not to get any on the metal. If you do get paint on the metal, that’s ok. You can always clean it up a bit later. Now, it’s important to remember that several thin coats are better than one thick coat, so if you’re still seeing some black under the flesh tone that’s fine, just wait for the layer to dry and then go over it again.
(3) Now if you look closely, you’ll notice that the Chasseur is wearing fatigues under his armour. You’ll want to give those a coat of Eshin Grey(Couldn’t find a match on my colour chart, use the darkest Grey you have), all done for now? Marvellous.

Step 3: Layers and washes.
Now we come to the fun parts!
(1) Begin by taking your wash brush (any largish brush that you can load a lot of wash into) and loading it up with a nice deep blue wash. I use Drakenhof Nightshade for this. Start applying it to the model, and try to make sure you don’t get any wash pooling on the flat panels of the leg armour as the tide marks will disrupt the look we’re going for.

(2) Once the wash has dried, move onto the first layer of the skin. Mix Rakarth Flesh and Pallid Wych Flesh together at a 1:1 ratio with a drop of medium (or water if you don’t have any), to get it flowing nicely. Now, take your standard brush and start painting the raised areas of the flesh, this will be the muscle tone in his arms, shoulders, abs and the raised detail of the face.

(3) Next, it’s time to add some of the blue wash to your flesh mix, just a drop should be enough. With that, go in and even out the tone between the raised areas and the recesses of the skin where our first wash has settled. You don’t want to go over the recesses completely, so take your time and be careful.

(1) Your chasseurs skin should look something like this now. If not, don’t worry, you can always go back with the blue wash in the recesses and try again. Now we’re ready for the second layer of skin, so take your Pallid Wych Flesh and add just a drop to the mid tone from above. This will give you a nice light skin tone for hitting the most raised points on the model the tops of the muscles, the head and the face. You could also do the abs, but it’s not necessary as the light won’t really reach that point with the gun in the way.

(2) Now it’s ready for another wash. This will be a custom wash, using 1 drop of Blue Horror (failing that, the softest blue you have mixed with a bit of white to get it nice and pale), to 3 drops of medium (I use Lahmian Medium from GW, Vallejo and others have their own acrylic mediums and you can find this sort of stuff easily from art shops or online). Apply this all over the skin and wait for it to dry.

(3) Final layer of skin! And the face! This time I’m using pure Pallid Wych Flesh just on the tips of the raised areas again the muscles, head, shoulders and face.

Coming to the face, there’s two ways you can pick it out. The first and easiest for those just beginning their painting journey (or those who just hate trying to paint faces) is to get some blue wash and go over the face again, once that has dried pick out the raised areas (this being the upper lip, the chin, the cheek bones, brow, nose and forehead) with the Pallid Wych Flesh and leave it at that.
The second way we can do this is to go and paint in the eyes. Start with your detail brush and paint in the eye socket with a bit of black, this lets you make the eye noticeable without losing it to the pallid unhealthy white of the skin. Now when it comes to eyes, you want to use a grey or an off-white for the eyeball. Stark white doesn’t make for good eyes at this scale, and it just makes your model look surprised or startled. Take a drop of your preferred colour, and mix some medium and/or flow retarder in to keep it from drying out on your brush before you can actually paint with it. Carefully paint the eyeball, with a nice thin line along the middle of your black eye socket. Next, you want to cover over the black, while leaving a tiny sliver to separate the eye and face.
Finally, try and dot the eye. There’s a few ways of doing this: you can use a very fine tipped micron pen, a sewing needle tip, or your brush if you can manage to control it. I used the last method myself, but the micron pens are a great alternative and you should be able to buy them at any good art store (if they don’t have any they can probably order it in for you).
Step 4: Armour and guns.
We’re almost done now, stay with me here! It gets much easier from here on out.
(1) Now we come to the armour and guns. The legs, forearms, and gun were given a lick with the blue wash before, and now I want you to do so again. Once that has dried, You’re going to do a very light dry-brush with Ironbreaker along the armour plates and mechanisms. After that, take your detail or standard brush and highlight the edges of the armour plates.

(2) With that finished, take your detail brush and highlight the edges of the chest plates as well. This spot is too delicate for the drybrush, and after all the effort you went to, you don’t want to have to reset it because you got some silver where it shouldn’t have gotten. All done, that’s the armour finished! Now let’s go for the gun.
(3) This figure is armed with the PR4000 ‘Blaster’, so take your standard brush and grab a drop of Caledor Sky. Apply it to the coil at the front of the gun and the canister underneath.

(4) Now you’re going to highlight the coil and canister with some Baharroth Blue, making sure you hit the raised coils and the bottom half of the canister.

(5) As a final highlight, use a bit of White Scar on top of the coils and the bottom of the canister.

Step 5: Basing.
The last step, and it’s an easy one. I’m using the basing paints from Games Workshop, but you can also use a bit of sand or pumice gel from your local art shop. The basing paint and pumice gel follow roughly the same method, and I’ll go over working with basing sand too.
(1) Starting off, apply some Blackfire Earth texture paint to the base. Spread it out to get it looking nice and natural, as you can imagine the landscape of mars may look like, and wait for it to dry.

(2) Now that that’s dry, you’re going to hit it with a wash. I use Carroburg Crimson, this is to tint the brown down to a nice earthy red.

(3) Once that’s nice and dry, do a light drybrush with Squig Orange over the top. Don’t worry about getting any Blackfire Earth or Squig Orange on the feet and ankles of your Chasseurs, boots get dirty in the field and it’ll add to the overall look.

Now for the basing sand (if you don’t have the basing paint or pumice gel).
(1) Apply some PVA glue to your model’s base before covering it with the sand of your choice, and allow it to dry.
(2) Once dry (give or take 20 minutes to be workable, though the longer the better), you want to seal it. Do this by taking some PVA and thinning it with some water so it’s nice and fluid. Then slosh it over the sand (again leaving to dry fully).
(3) Once dried, paint the sand a vibrant brown of your choice, though I recommend Skrag Brown as it matches Blackfire Earth nicely. Wash it down with Carroburg Crimson and finally a light drybrush over the top with the Squig Orange. All done, good job.

And with that done, all that’s left to do is paint the rim of the base. I prefer a nice brown like Rhinox Hide for this. If you’re so inclined, I mark out the model’s facing with Mournfang Brown, and then an orange triangle lined up with where the model’s face is looking.
I hope you enjoyed reading my painting guide and that it was of use to you! Until next time, good luck and have fun
Paint Matching Guide:
Citadel colour listed first. Equivalents are listed by colour name, with brand in brackets. List is in order of use through the guide.
- Leadbelcher: Boltgun Metal (Old Citadel), Gunmetal (Vallejo Game Color), Gunmetal Grey (Vallejo Model Color), Shadowed Steel (Reaper Masters), Pig Iron (P3)
- Rakarth Flesh: Heavy Warmgrey (Vallejo Game Color), Vampiric Shadow (Reaper Masters)
- Drakenhof Nightshade: Blue Shade Wash (Vallejo Game Color)
- Pallid Wych Flesh: I couldn’t find a match for this unfortunately.
- Blue Horror: It’s a pastel blue, something you should be able to find in any range
- Ironbreaker: Chain mail (Vallejo Game Color), Natural Steel (Vallejo Model Color), Honed Steel (Reaper Masters), Cold Steel (P3).
- Caledor Sky: Enchanted blue (Old Citadel), Magic Blue (Vallejo Game Color), Dark Blue (Vallejo Model Color), Cyan Blue (Reaper Masters).
- Baharroth Blue: No match on the colour chart I use.
- White Scar: Any ranges white paint should be okay.
- Blackfire Earth: Parasite Brown (Vallejo Game Color), Orange Brown (Vallejo Model Color), Chestnut Brown (Reaper Masters)
- Carroburg Crimson: Red Shade Wash (Vallejo Game Color)
- Squig Orange: No direct match. Pale orange, closer to a flesh tone than anything.
- Skrag Brown: Parasite Brown (Vallejo Game Color), Orange Brown (Vallejo Model Color), Chestnut Brown (Reaper Masters)
- Rhinox Hide: Charred Brown (Vallejo Game Color), Burnt Umber (Vallejo Model Color), Muddy Brown (Reaper Masters), Umbral Umber (P3)
- Mournfang Brown: Beasty Brown (Vallejo Game Color), Flat Brown (Vallejo Model Color), Intense Brown (Reaper Masters), Bloodtracker Brown (P3)

Reblogged this on talesfromthemancave and commented:
Some great work on painting Chasseurs for Cybertronic from PRODOS Games Warzone Resurrection.
Loving the colour scheme especially the pallid, deathly Borg like flesh.
Keep up the great work Evan!
Do you need to wash the minis in soapy water before painting? Fantastic paint job!
Hey, wow, this comment alert sure was delayed.
Washing the models in some warm soapy water wouldn’t hurt, Prodos says that their models are fine to paint right out the box but I often find that they need a good cleaning beforehand to get rid of the mold release agent they use.